Christmas Macarons

Hi friends! Welcome to my french macaron tutorial & recipe. If you’ve never had a macaron, or if you’ve had one and LOVE them and want to give baking them a try, this is a perfect recipe to start with. You might have heard of the finicky nature of these cookies if you’ve browsed the internet, but no worries! I want to take your fear out of baking these sweet treats. There are no complicated ingredients or instructions, but this post will be very detailed so you can be successful!

Your basic macaron (mac) recipe has just 4 main ingredients. Almond flour, confectioners sugar, granulated sugar, and egg whites. Some recipes add salt and cream of tartar to stabilize the meringue, and I opt to do that as well since I’ve had good results that way.

The secret to making a beautiful mac is technique! You need to know how to whip egg whites into a stiff meringue, and then how to fold the batter until just the right moment.

To give you the best chance for success, you’ll need a few key kitchen tools. Macs are easy when you have the right tools for the job!
- Oven thermometer-accurate temperature is so important for these cookies!
- Food Scale-you’ll be measuring the ingredients in grams.
- Sheet trays lined with silicone baking mats or parchment paper-you’ll need 2-3 trays, depending on the size tray you are using. I use 3 half sheet trays for this batch.
- Piping bag with large round tip-I use Wilton 2A tip, and a large zip plastic bag.
- Food processor
- Sifter-hand sifter or a bowl sifter is fine.
- Stand mixer or hand mixer-(unless you like to whip meringue into stiff peaks by hand!)
Now let’s get to the recipe!
Ingredients:
- 3 egg whites (room temp)
- 100 grams almond flour
- 155 grams confectioners sugar
- 50 grams granulated sugar
- 1/4 tsp cream of tartar
- Dash of salt
- 1/2 tsp vanilla extract
- Optional-gel or powdered food coloring
- Optional-sprinkles
To begin, lets get out all of our tools and ingredients.
- Line your pans with baking mats or parchment paper and set aside.
- Fit a piping bag with the tip, and place it over a vase or tall cylinder so you can pour your batter in later. (Note: I clip the end of my bag so no batter can pour until I’m ready! I also go ahead and put my spatula here until I’m ready for it.)
- Place a small bowl on your scale, and zero it. Make sure your measurement is set to grams. Measure 50 grams of granulated sugar.
- Place the bowl of a food processor onto your scale, and zero it again. Measure 100 grams of flour, then zero scale and measure 155 grams of confectioners sugar.
- Move the bowl to your processor, and pulse until you get a fine powder.
- Sift this mixture twice until you have about one tablespoon of almond bits left. You can discard these, or if you have a spice grinder, run these through and then sift in with the remaining mixture.
- Separate your egg whites into the bowl of your stand mixer. **If you’re using a hand mixer, use a glass or stainless steel bowl for this-no plastic bowls for whipping meringue!**
- Place your bowl into the mixer with the whisk attachment and add the salt and cream of tartar.
- Whip egg whites until they start to look bubbly and frothy, and add granulated sugar. Continue to whip on medium-high speed until stiff peaks form, checking every 3 minutes. In my mixer, this takes around 8-9 minutes. Once you’ve reached stiff peaks, add the vanilla and food coloring, and whip just until color is mixed throughout.
- Remove the bowl from the mixer, and turn on it’s side. Yes! Sideways! The meringue should be stiff, glossy, and SHOULD NOT MOVE. You should be able to flip the bowl upside down over your head and the meringue will not budge. (I actually do this-it’s the best tip I’ve ever found for knowing when the meringue has reached perfection.)
- Add the almond flour-confectioners sugar mixture to the meringue all at once, and fold in with a soft rubber spatula. Fold gently, turning the bowl as you go. Pick the spatula up with batter on it, if it falls in clumps, you’re not quite there yet. You want to keep folding only until the mixture falls from the spatula in one thick, long, continuous ribbon. Do not continue to mix after it falls in a ribbon!
- Gently pour the batter into your piping bag, and twist the end to make sure no batter escapes from the top.
- Pipe the batter in quarter size circles for tiny cookies, and 2 inch circles for larger cookies.
- With a toothpick, quickly pop air bubbles that rise to the surface. You can also gently tap the bottom of the tray with your hands to pop the bubbles.
- If you’re using sprinkles, you can add them now while the batter is still wet.
- Let the trays rest until a smooth skin forms on top of the cookies. This can take anywhere from 15 up to 45 minutes in a humid kitchen. You should be able to touch the batter and remove your finger without any residue sticking to it.
- While the cookies are resting, preheat your oven to 375 F.
- Once cookies are dry, you can bake! Place one sheet of cookies into the oven and immediately lower temp to 325 F. Bake for 13-16 minutes, checking at 13. To test for doneness, reach in and gently try to move a shell. If it wiggles on its base, it isn’t done yet! Bake for 1 minute longer, testing after each minute. When the cookies are fully done, they no longer move when touched, but stick to the sheet.
- Remove from oven and let cool completely.
- Raise temp on oven back to 375 before you add the next tray, immediately lowering to 325 again.
- While shells are cooling, prepare your icing.
- Once all shells are cool, remove them the trays. Match shells to a similar size partner, and flip upside down.
- To assemble, pipe icing onto one shell, and then sandwich together.
- You can enjoy immediately, but I find macs taste best the day after. Once filled and sandwiched, place cookies in a plastic or glass container with a lid and put in the fridge overnight. After refrigeration, let cookies come to room temp before enjoying.
- If you over baked and have crispy macs, no worries! The filling will soften even the crispiest of cookies. The higher moisture content in the filling, the quicker the cookies will mature (soften).
The most important thing to remember is that MACARONS DO NOT HAVE TO BE PERFECT TO BE DELICIOUS!
I’ve had my share of disastrous outcomes when baking these cookies, but I hope my tips help you to have your best batch yet.
Below are a few examples of how your cookies can look depending on baking temperature and surface.
These were baked on parchment paper, right temp but a maybe a minute too short. Some had a few small air pockets at the top, but still a gorgeous cookie that tastes delicious!
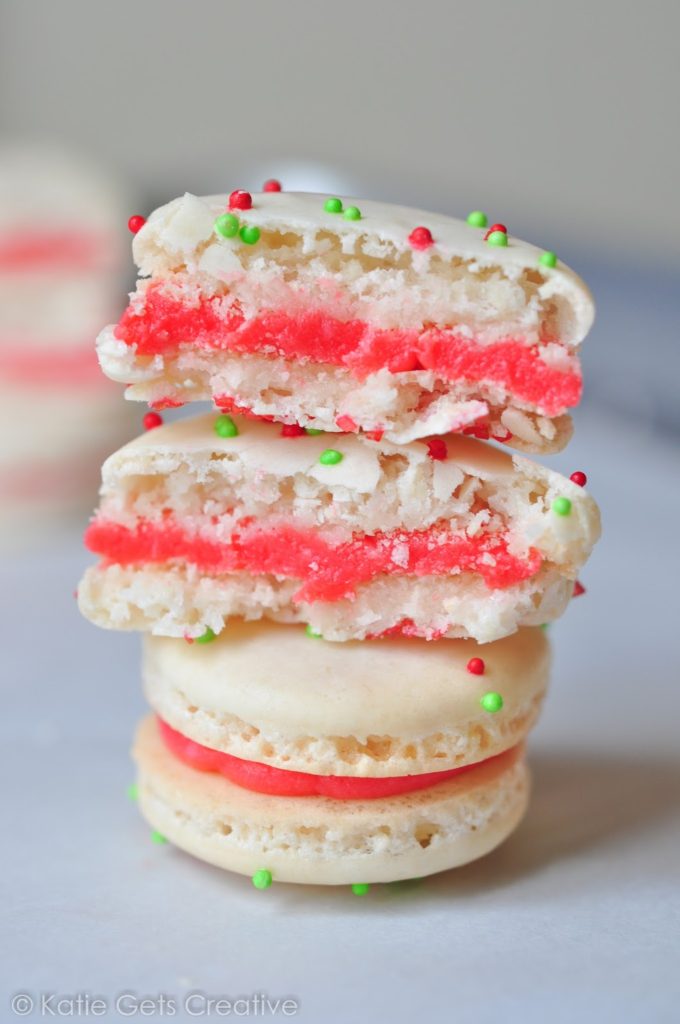
Baked on silicone baking tray, at the right temp, but not baked quite long enough for meringue to set.
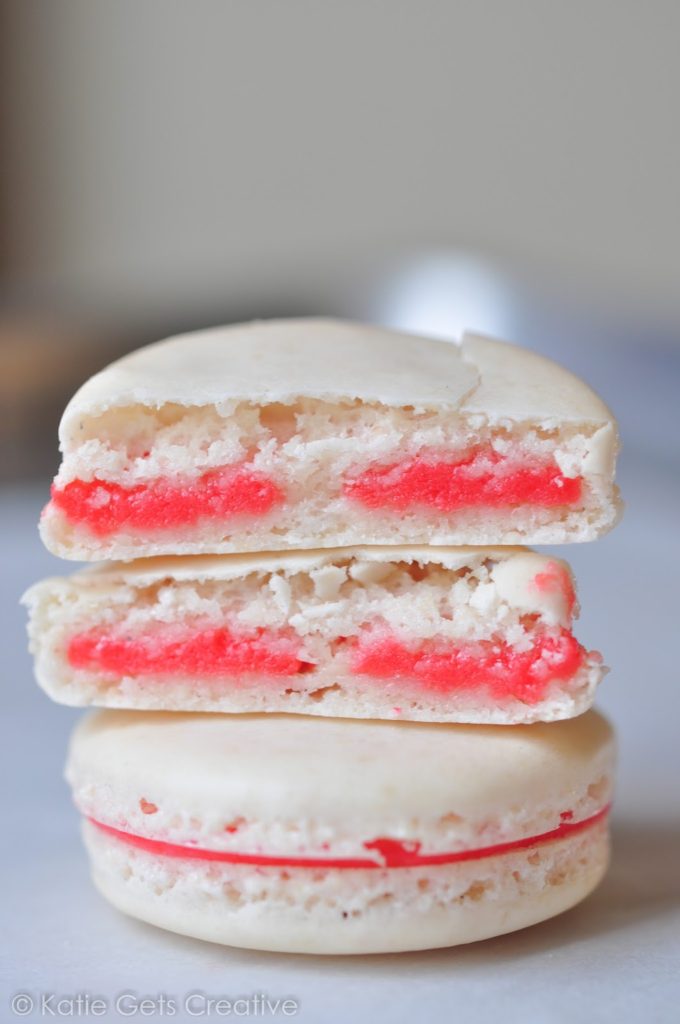
Baked on silicone baking mat, with low, cracked feet because they were baked on too low temp. They were in the oven a little bit too long, causing slight browning on the shells.


I hope you’ve enjoyed my recipe, and best of luck to you with your macs!

Vanilla Sprinkle Macarons
Ingredients
- 3 egg whites, room temp
- 100 grams almond flour
- 155 grams confectioners sugar
- 50 grams granulated sugar
- 1/4 tsp cream of tartar
- Dash of salt
- 1/2 tsp vanilla extract
- Optional-gel or powdered food coloring
- Optional-sprinkles
Instructions
To begin, lets get out all of our tools and ingredients.
- Line your pans with baking mats or parchment paper and set aside.
- Fit a piping bag with the tip, and place it over a vase or tall cylinder so you can pour your batter in later. (Note: I clip the end of my bag so no batter can pour until I’m ready! I also go ahead and put my spatula here until I’m ready for it.)
- Place a small bowl on your scale, and zero it. Make sure your measurement is set to grams. Measure 50 grams of granulated sugar.
- Place the bowl of a food processor onto your scale, and zero it again. Measure 100 grams of flour, then zero scale and measure 155 grams of confectioners sugar.
- Move the bowl to your processor, and pulse until you get a fine powder.
- Sift this mixture twice until you have about one tablespoon of almond bits left. You can discard these, or if you have a spice grinder, run these through and then sift in with the remaining mixture.
- Separate your egg whites into the bowl of your stand mixer. **If you’re using a hand mixer, use a glass or stainless steel bowl for this-no plastic bowls for whipping meringue!**
- Place your bowl into the mixer with the whisk attachment and add the salt and cream of tartar.
- Whip egg whites until they start to look bubbly and frothy, and add granulated sugar. Continue to whip on medium-high speed until stiff peaks form, checking every 3 minutes. In my mixer, this takes around 8-9 minutes. Once you’ve reached stiff peaks, add the vanilla and food coloring, and whip just until color is mixed throughout.
- Remove the bowl from the mixer, and turn on it’s side. Yes! Sideways! The meringue should be stiff, glossy, and SHOULD NOT MOVE. You should be able to flip the bowl upside down over your head and the meringue will not budge. (I actually do this-it’s the best tip I’ve ever found for knowing when the meringue has reached perfection.)
- Add the almond flour-confectioners sugar mixture to the meringue all at once, and fold in with a soft rubber spatula. Fold gently, turning the bowl as you go. Pick the spatula up with batter on it, if it falls in clumps, you’re not quite there yet. You want to keep folding only until the mixture falls from the spatula in one thick, long, continuous ribbon. Do not continue to mix after it falls in a ribbon!
- Gently pour the batter into your piping bag, and twist the end to make sure no batter escapes from the top.
- Pipe the batter in quarter size circles for tiny cookies, and 2 inch circles for larger cookies.
- With a toothpick, quickly pop air bubbles that rise to the surface. You can also gently tap the bottom of the tray with your hands to pop the bubbles.
- If you’re using sprinkles, you can add them now while the batter is still wet.
- Let the trays rest until a smooth skin forms on top of the cookies. This can take anywhere from 15 up to 45 minutes in a humid kitchen. You should be able to touch the batter and remove your finger without any residue sticking to it.
- While the cookies are resting, preheat your oven to 375 F.
- Once cookies are dry, you can bake! Place one sheet of cookies into the oven and immediately lower temp to 325 F. Bake for 13-16 minutes, checking at 13. To test for doneness, reach in and gently try to move a shell. If it wiggles on its base, it isn’t done yet! Bake for 1 minute longer, testing after each minute. When the cookies are fully done, they no longer move when touched, but stick to the sheet.
- Remove from oven and let cool completely.
- Raise temp on oven back to 375 before you add the next tray, immediately lowering to 325 again.
- While shells are cooling, prepare your icing.
- Once all shells are cool, remove them the trays. Match shells to a similar size partner, and flip upside down.
- To assemble, pipe icing onto one shell, and then sandwich together.
- You can enjoy immediately, but I find macs taste best the day after. Once filled and sandwiched, place cookies in a plastic or glass container with a lid and put in the fridge overnight. After refrigeration, let cookies come to room temp before enjoying.
- If you over baked and have crispy macs, no worries! The filling will soften even the crispiest of cookies. The higher moisture content in the filling, the quicker the cookies will mature (soften).
Notes
- Oven thermometer-accurate temperature is so important for these cookies!
- Food Scale-you’ll be measuring the ingredients in grams.
- Sheet trays lined with silicone baking mats or parchment paper-you’ll need 2-3 trays, depending on the size tray you are using. I use 3 half sheet trays for this batch.
- Piping bag with large round tip-I use Wilton 2A tip, and a large zip plastic bag.
- Food processor.
- Sifter-hand sifter or a bowl sifter is fine.
- Stand mixer or hand mixer-(unless you like to whip meringue into stiff peaks by hand!)




Making Macarons has been on my list for a while. Your recipe looks fantastic! Found you on the Link Party Palooza.
Hi! Thank you so much for stopping by! I hope you try macs. They're really worth the effort. Good luck and if you have any questions or I can help, let me know!