How to make a Sunburst Granny Square
The sunburst granny square is having a moment! This gorgeous square is making its rounds on social media in all kinds of projects-blankets, cardigans, bags, pillows. There’s a reason it’s so popular. It’s a beautiful, delicate looking square, and it’s so easy to make. It’s quick to whip up several of them while listening to your favorite podcast or watching a movie.
Let’s dive in and learn how to make this easy square! I prefer a tight, seamless looking granny square and this tutorial has all my tips to achieve this look.

This post contains affiliate links, which means I make a small commission at no extra cost to you. See my full disclosure here.
Tools you’ll need: 4.5mm hook, darning needle, scissors, and a worsted weight yarn
Note about hook size: I use a smaller than recommended hook for this yarn because I like my squares to be tighter and less “holey” than crochet tends to be.
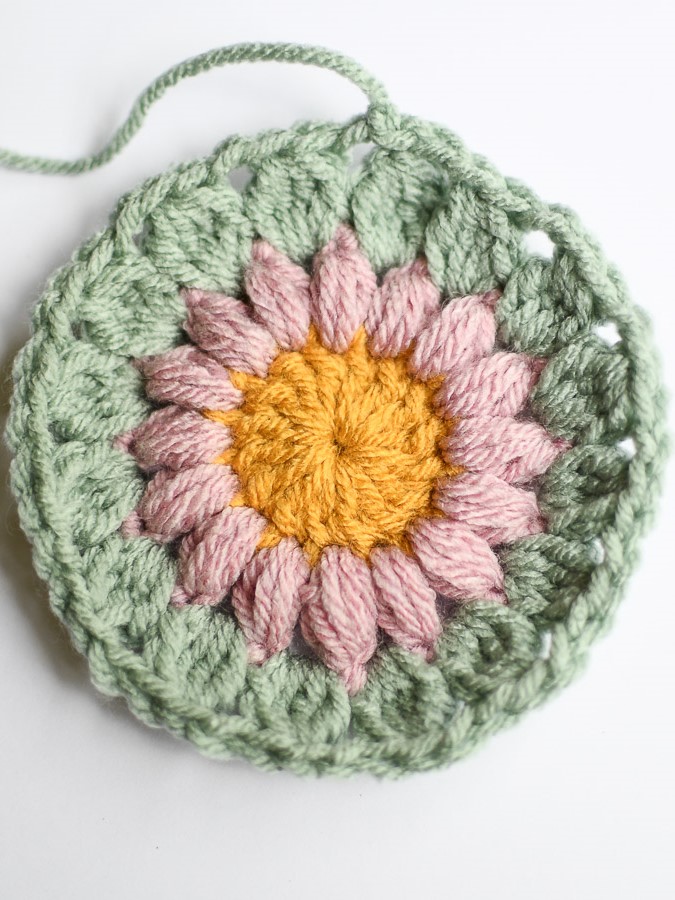
Yarn: I’m using worsted weight yarn from Hobby Lobby. Color ways in this square are Rosewater, Spa, Soft Shell and Sungold. I made an entire blanket with these, which I’ll be sharing soon!
Special Stitches:
Puff Stitch: Yarn over and insert into stitch, YO and pull up a loop (3 loops on hook). YO and insert into stitch, YO and pull up a loop (5 loops on hook). Repeat once more (seven loops on hook). YO and pull through all 7 loops on the hook. Chain 1 to lock it in place. This completes one puff stitch.
Partial Cluster: Yarn over and pull up a loop, then pull through 2 stitches (not all). Repeat twice more until you have 4 stitches on the hook. Pull through all 4 loops then chain 2.
Cluster: Yarn over and insert into the stitch, then pull up a loop, then pull through 2 stitches (not all). Repeat three more times until you have 5 stitches on the hook. Pull through all 5 loops then chain 2.
Quick Pattern for experienced crocheters
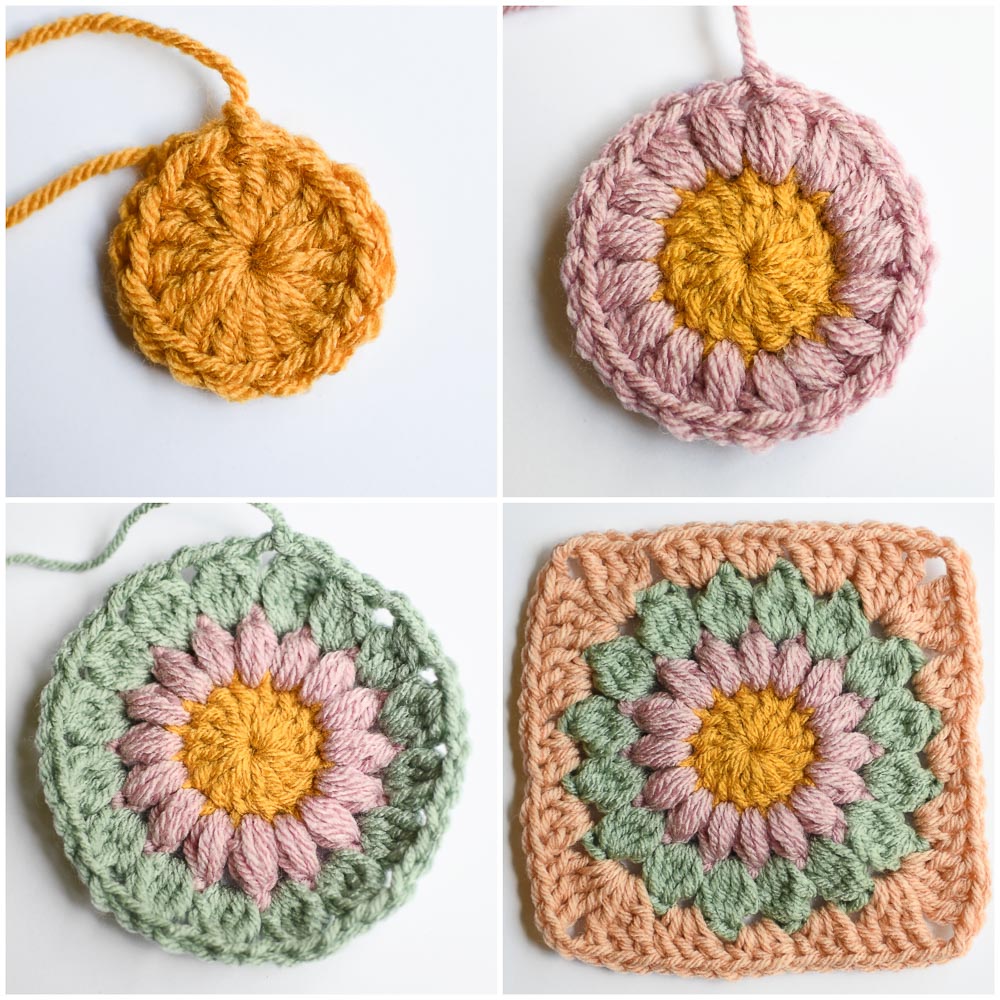
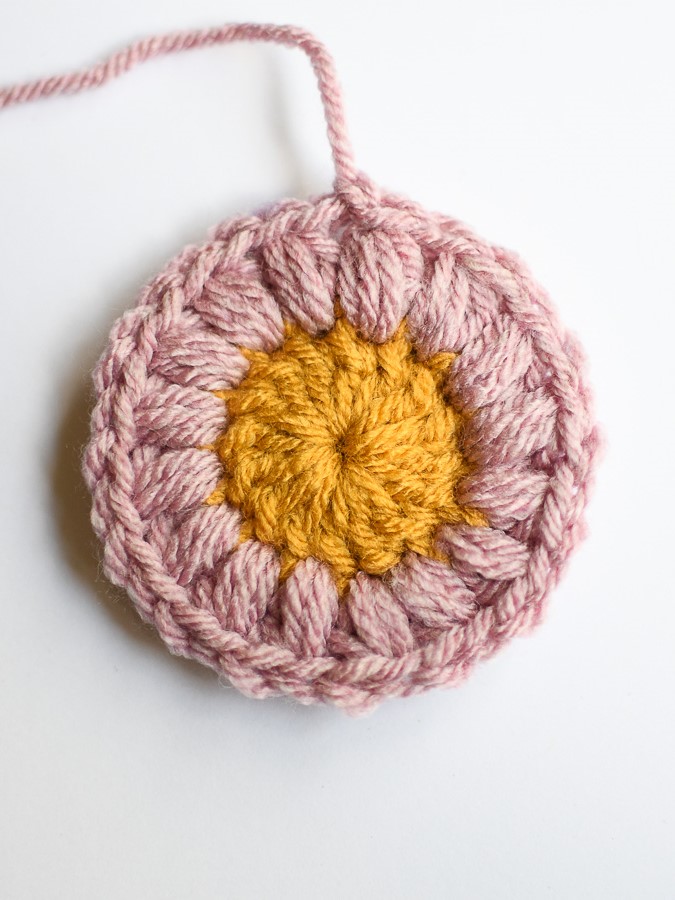
Round 1: In a magic ring, Ch 3 and 15 DC. Slip stitch to the top of the first DC, not the Ch 3. Fasten off. (16 total stitches)
Round 2: Attach new yarn in any DC, then draw up a long Ch 1 and puff stitch in same space. Puff Stitch around in each DC. Slip stitch to the first Ch 1 space, not beginning puff stitch. Fasten off. (16 puff stitches made)
Round 3: Attach new yarn in any Ch 1 space, then Ch 2, and partial cluster (4 loops on hook) in same space. Regular cluster stitch in next space, and each space around. Slip stitch to the top of the first Ch 2 space, not first cluster. Fasten off. (16 cluster stitches made).
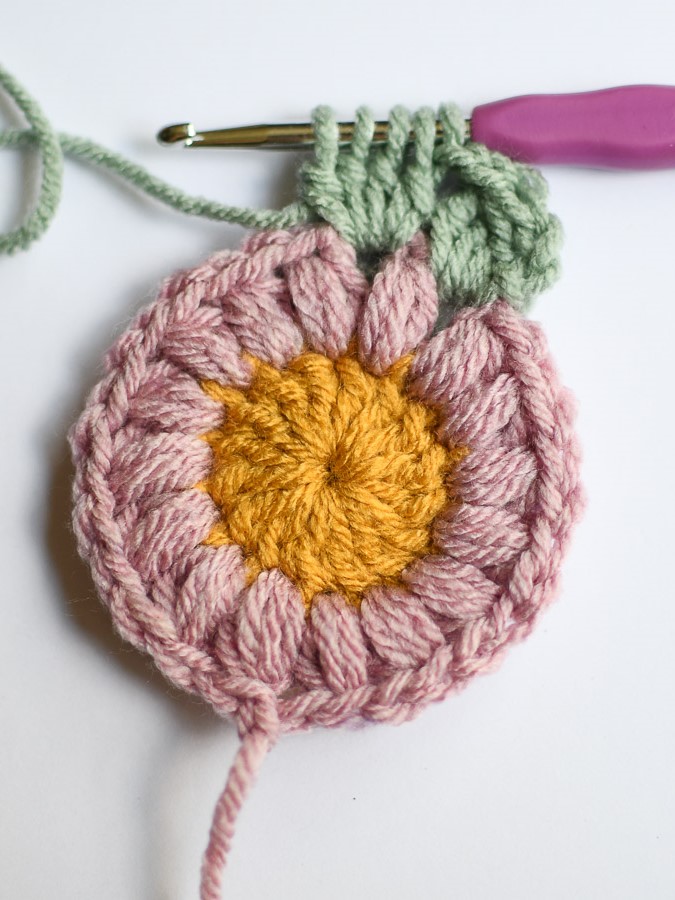
Round 4: Attach new yarn in any Ch 2 space, then (Ch 3, 2 Tr, Ch 2, 3 Tr), all in same space. In next space *3 DC. Next space, 3 HDC, then 3 DC in the following space. Next space, corner stitch: 3 Tr, Ch2, 3 Tr*. Repeat until you finish the last 3 DC section, then follow these instructions for a seamless look to finish off your square.
Step by Step Tutorial for Beginners
Round 1-Double Crochet
To begin, make a magic ring, and chain 3. The Chain 3 will count as your first Double Crochet stitch.
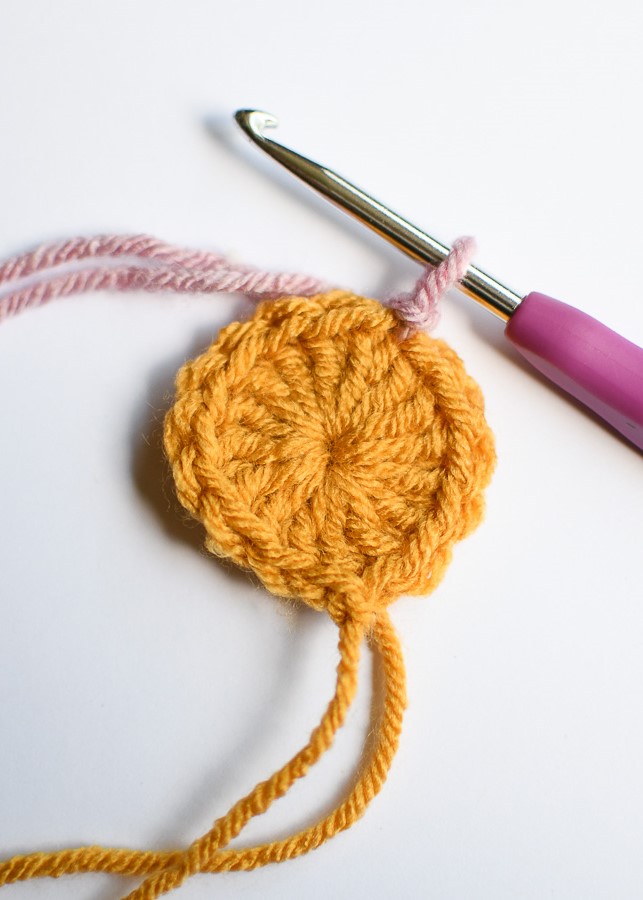
Add 15 Double Crochet into the ring. Slip stitch to the top of the first Double Crochet (not into the Ch 3). If you’re changing colors, cut yarn and fasten off. Pull tight on the beginning tail to close up the magic ring.
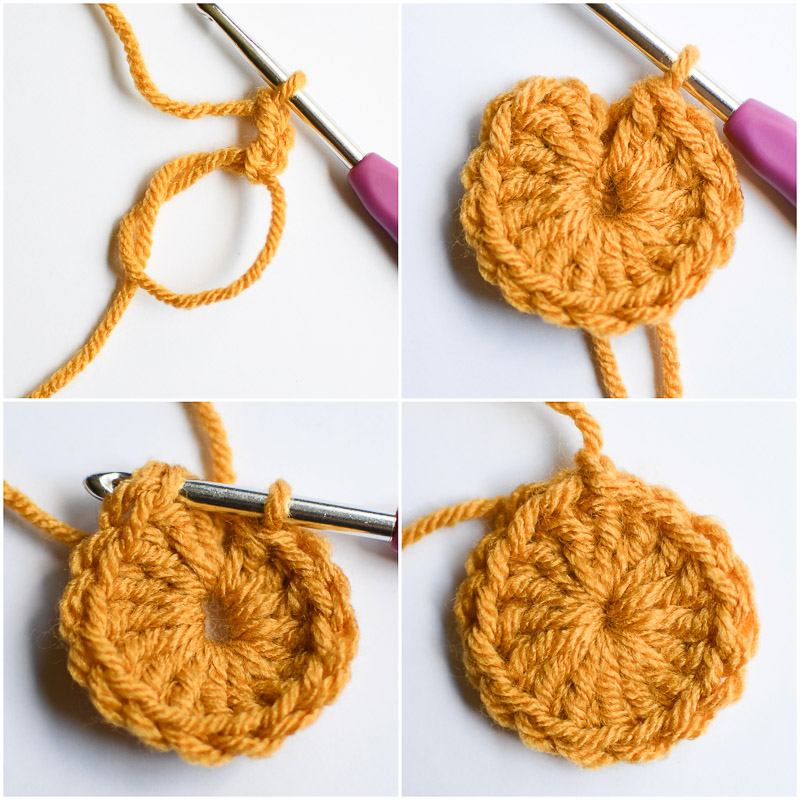
Round 2-Puff Stitch
If you’re continuing in a solid color, pull up a long chain 1, then puff stitch (instructions below photo) into the first stitch. If you’re joining a new color, in any DC, attach your new yarn and chain 1 but pull up a long stitch.
Yarn over and insert into stitch, YO and pull up a loop (3 loops on hook). YO and insert into stitch, YO and pull up a loop (5 loops on hook). Repeat once more (seven loops on hook). YO and pull through all 7 loops on the hook. Chain 1 to lock it in place. This completes one puff stitch.
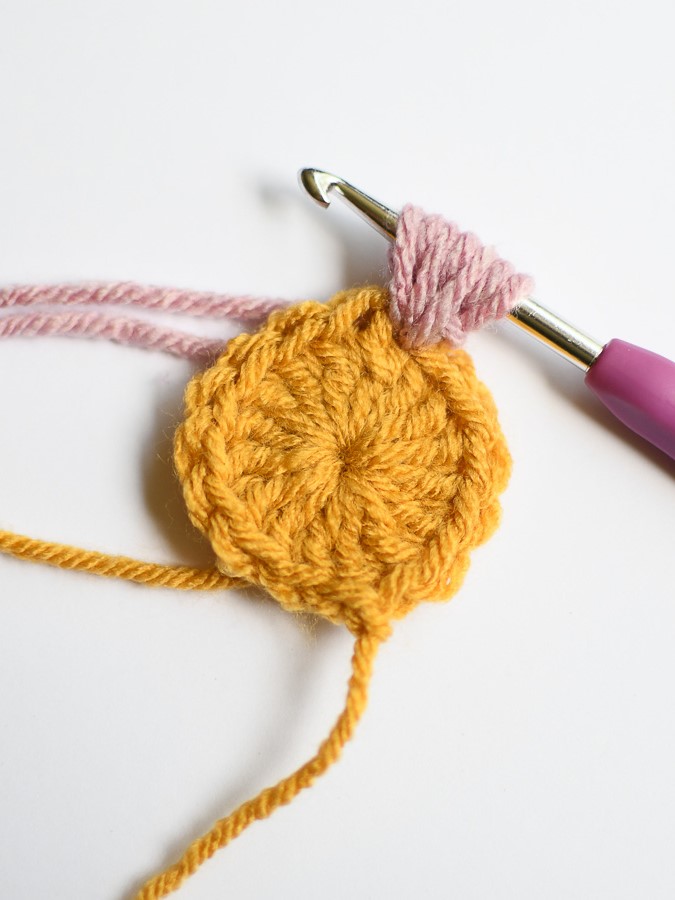
Continue all the way around the circle putting a Puff Stitch in each stitch, including into the slip stitch. Tip: Crochet over the tails as you go by holding them to the back of the work.
You should have 16 puff stitches at the end.
When you get to the end of the round, slip stitch into the first Ch 1 space, not to the top of the puff stitch. This gives the round a seamless look.
If you’re changing colors, cut yarn and fasten off.
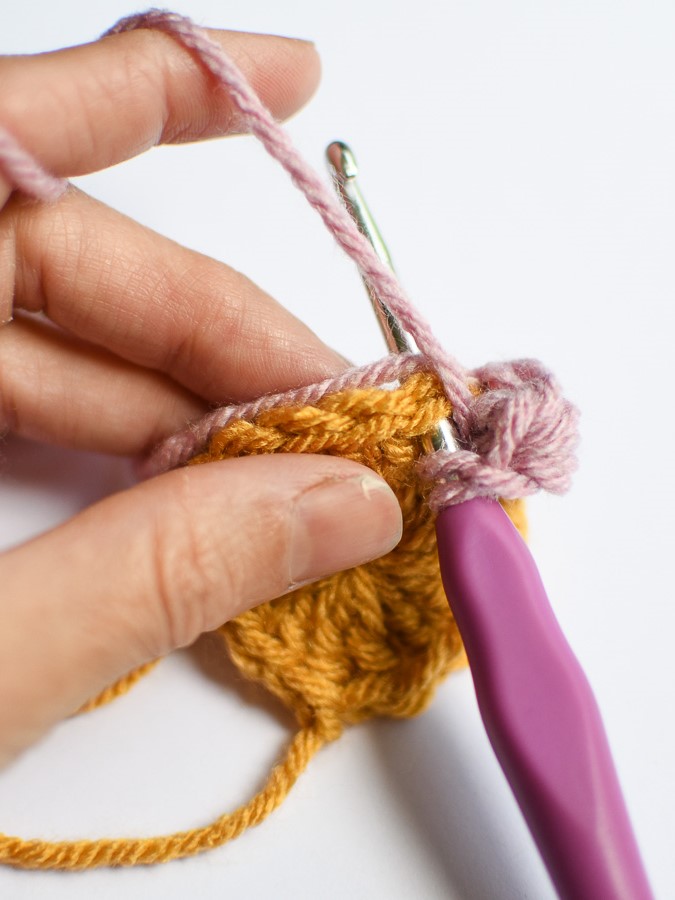
Round 3-Cluster Stitch
If you’re continuing in the same color, Ch 2. If you’re joining a new color, in any space, attach new yarn and Ch 2 (counts as first stitch of cluster).
Tip: I like to flip my work to the opposite side so I’m not crocheting over 2 tails at once.
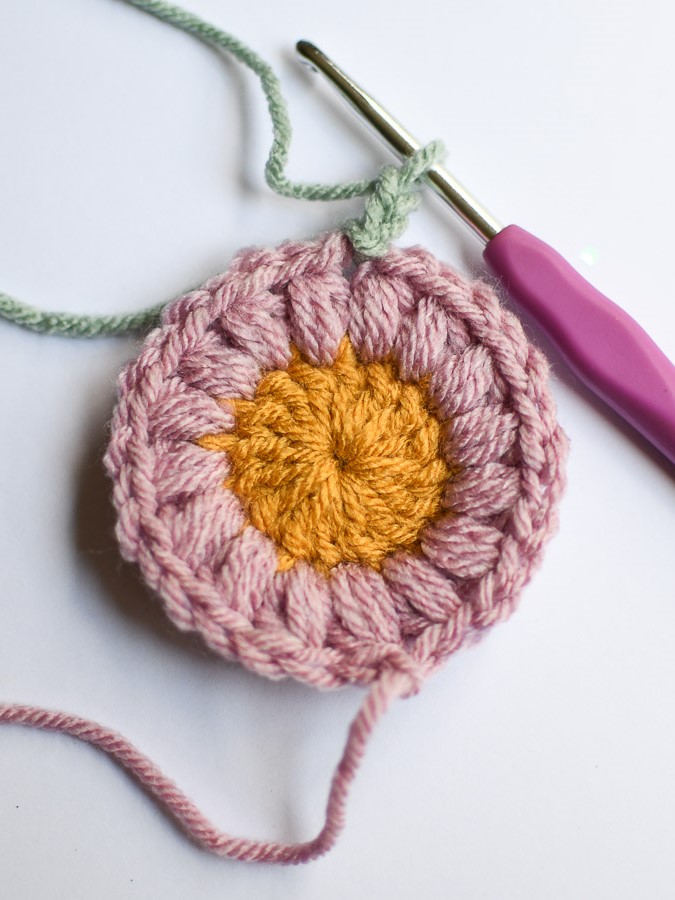
For the first stitch, yarn over and pull up a loop, then pull through 2 stitches (not all). Repeat twice more until you have 4 stitches on the hook. Pull through all 4 loops then chain 2. This creates a partial cluster stitch.

In the next space, yarn over and pull up a loop, then pull through 2 stitches (not all). Repeat three more times until you have 5 stitches on the hook. Pull through all 5 loops then chain 2 (Cluster Stitch made). Continue around in each space, ending with a chain 2.
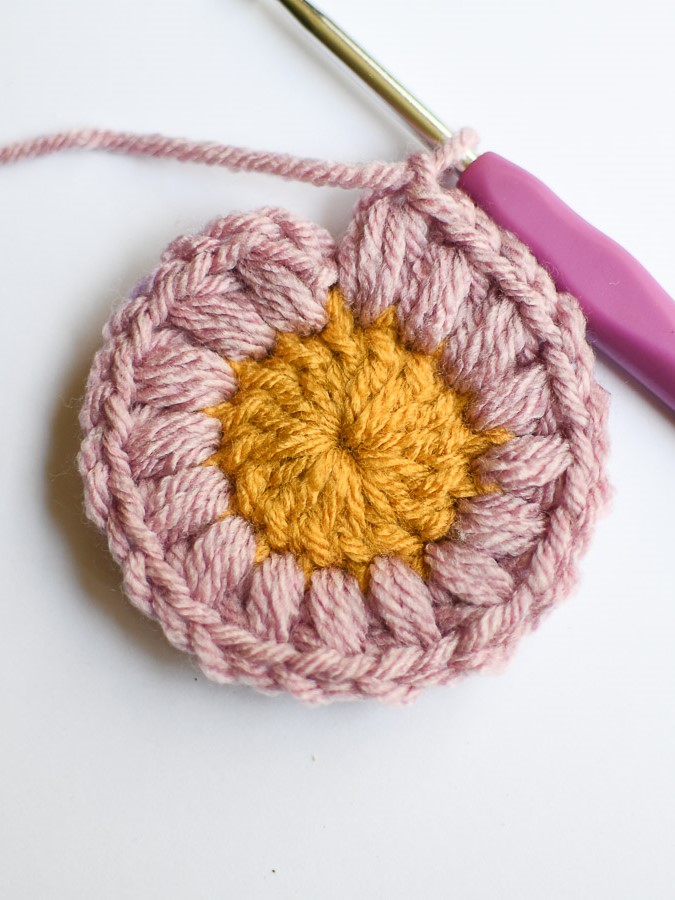
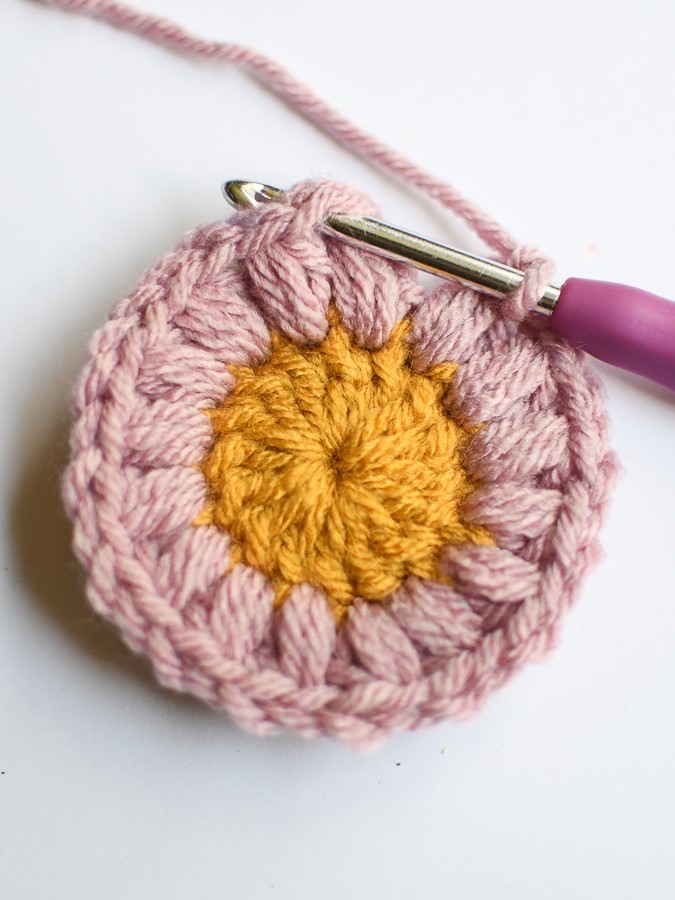
When you reach the end of the round, slip stitch in the first Ch 2 space, not to the first cluster stitch.
If you’re changing colors, cut yarn and fasten off.
Tip: If your project is using a 3 round motif and a join-as-you-go method for the 4th round, you can stop here. Continue to make as many circles as you need for your project. If your project uses a 4 round sunburst granny, then proceed to the next step.
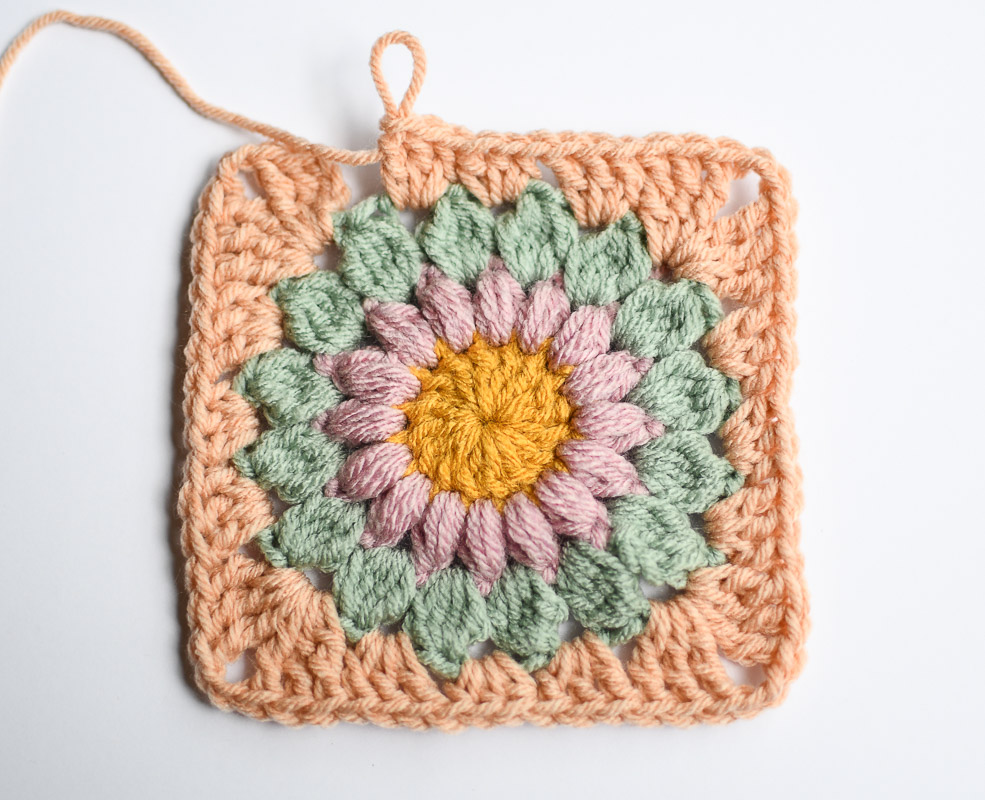
Round 4-Turn the rounds into a square
If you’re continuing in the same color, Ch 3. If you’re joining a new color, in any space, attach new yarn and Ch 3 (counts as first Treble stitch).
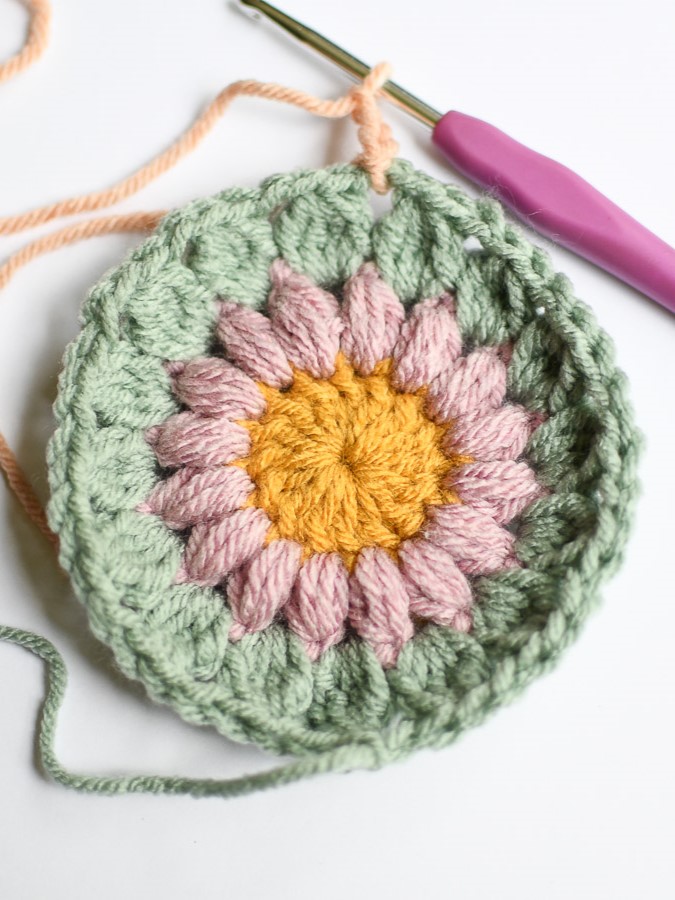
This begins the first corner. Add 2 Treble stitches, then Ch 2, followed by 3 more Trebles all in the same space. First corner completed.
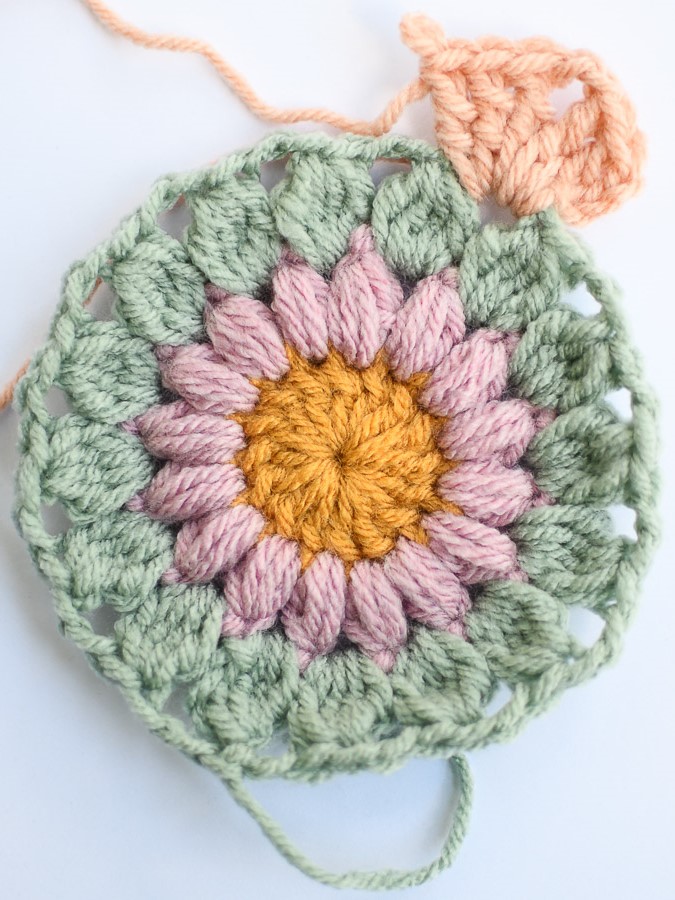
In the next Ch 2 space, *3 Double Crochet. Next space, 3 HDC. Next space 3 Double Crochet. Next space (corner) 3 Treble, Ch2, 3 Trebles all in the same space.* This is one side done.
Now we repeat from the * until the last space which will be 3 Double Crochet stitches.
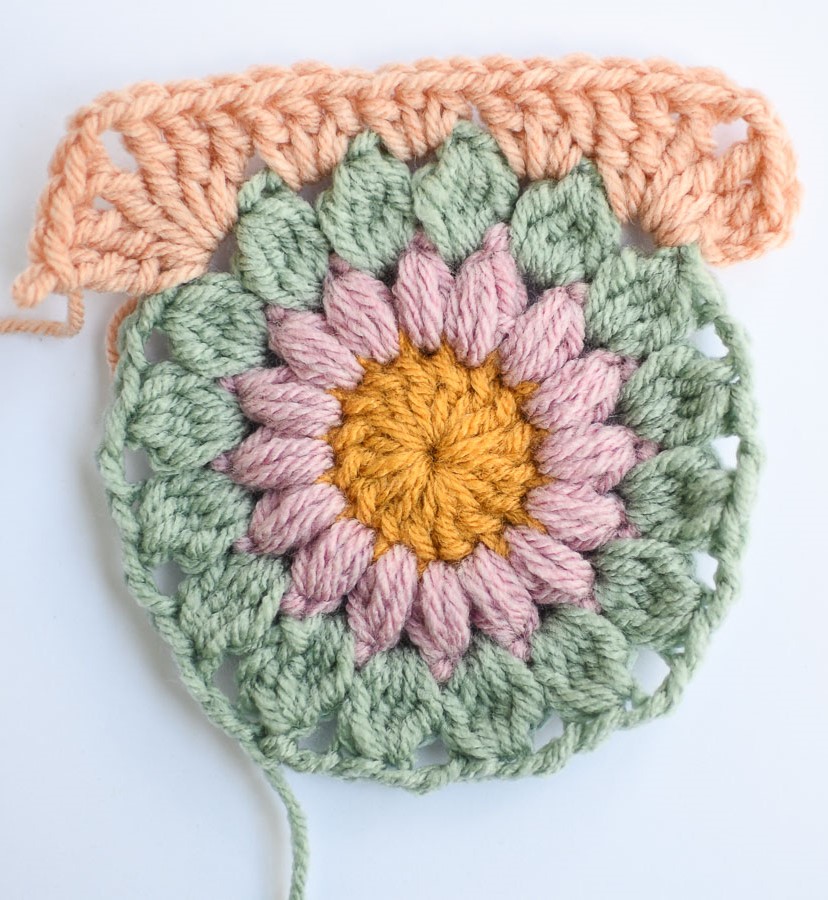
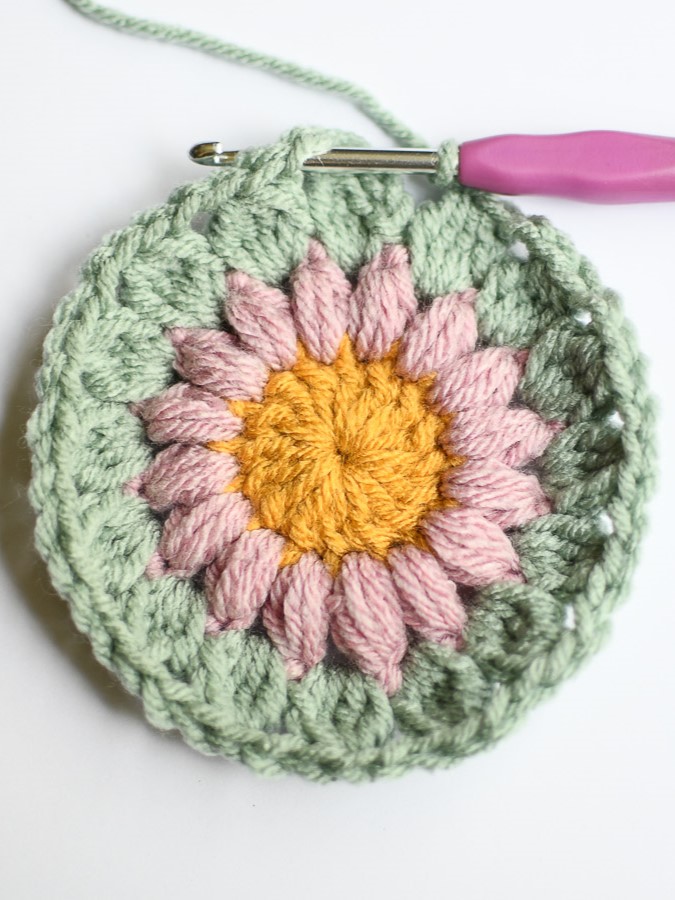
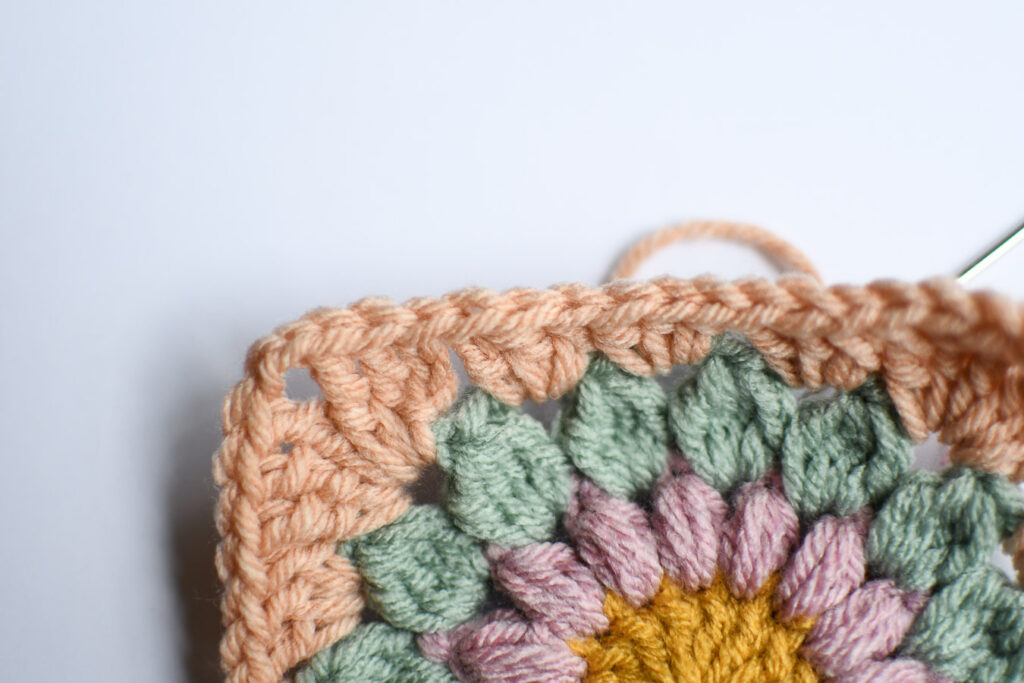
Instead of slip stitching and tying off, I finish this row with an invisible fasten off for a seamless look to the top of my square.
Seamless finish with invisible fasten off
Snip your yarn, leaving a 5-6 inch tail. Pull the yarn straight up through the stitch as shown below.
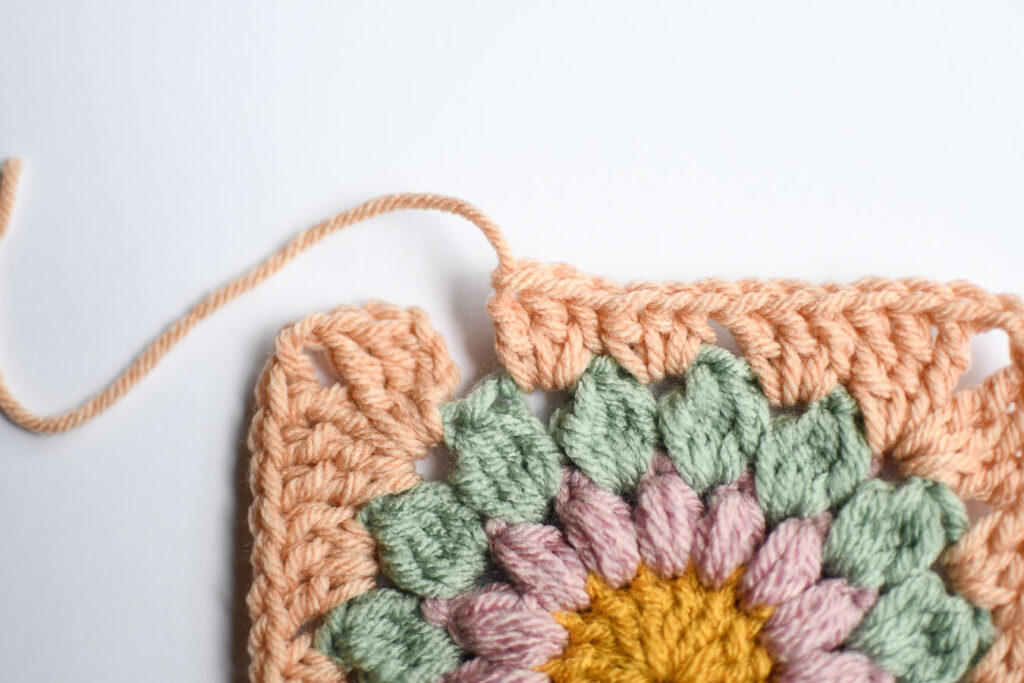
Thread the yarn tail on a darning needle. Find the first Treble stitch of the round (not the beginning Ch 3). We’re going to go under the top two loops from front to back with the needle. Then we’ll go back down through the center of the last double crochet (into the same space the yarn tail is coming out of).
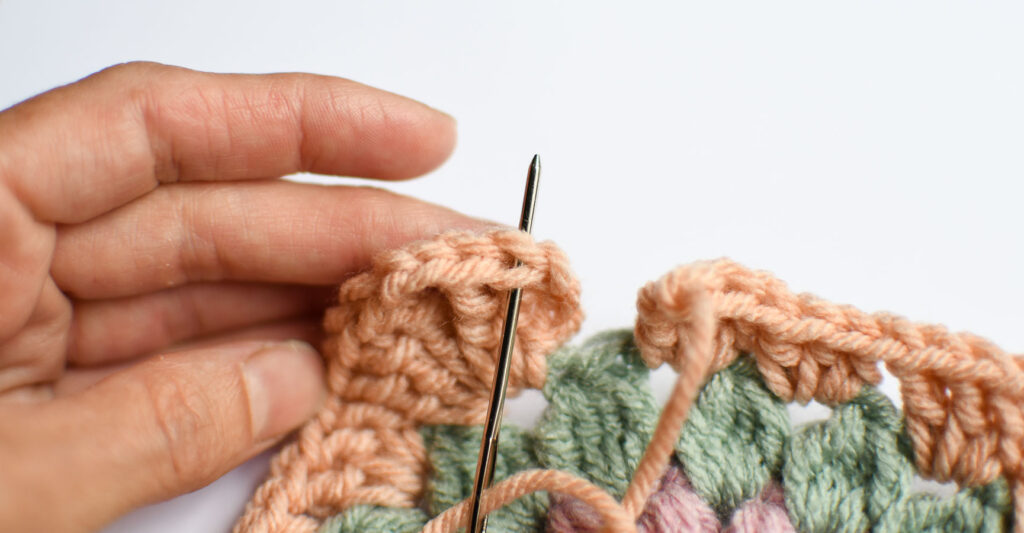
You’ll now have a long stitch separating the first treble and final double crochet (this long stitch will sit atop of the Ch 3 that begun the round, and will make a nice top for it to make it blend in with the rest of the stitches.)
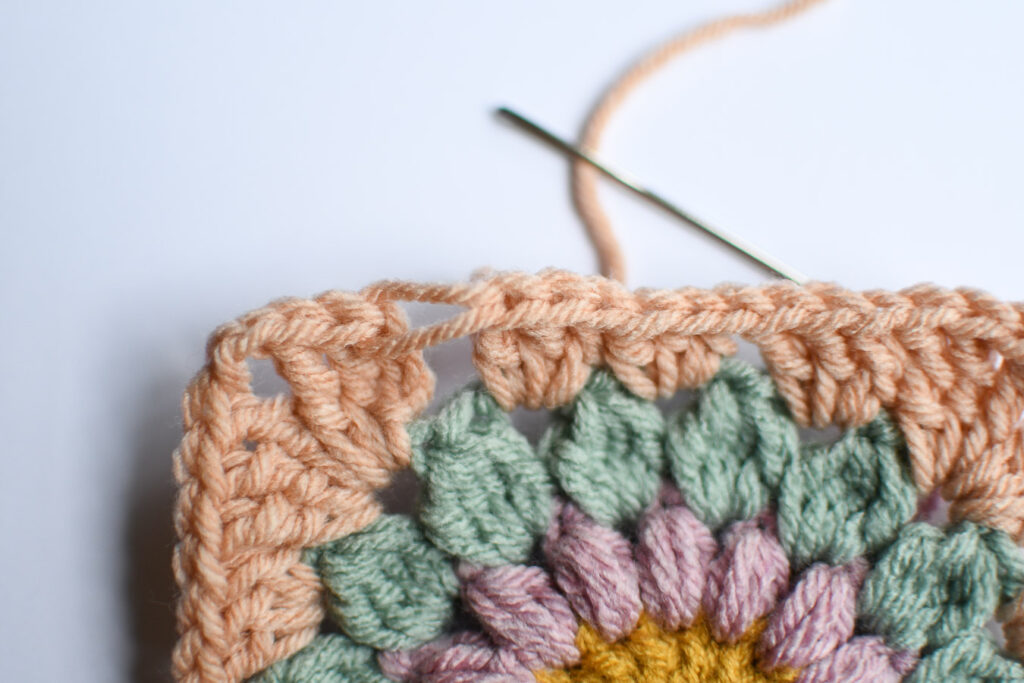
Gently tug the tail to pull the stitch tighter just until it blends with the rest of the stitches, then flip your work and weave it through. I tie a knot around the stitch as well for extra security.
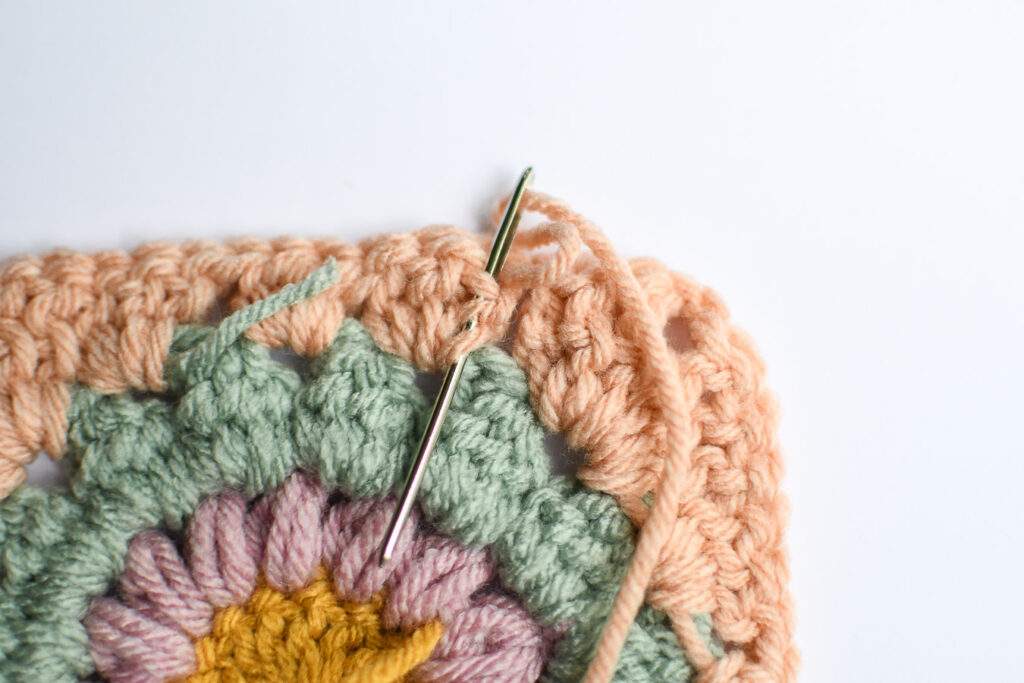
Now the top of your row looks nice and tidy with no visible beginning and ending to your round! It also makes joining your squares together a bit easier because there is no knot to work around on that final row. This is optional of course-it’s just how I prefer to do it!
Now let’s weave in the tail from the magic ring. Thread the tail through the needle, then slide it through the back loops of those double crochet stitches (taking care to make sure it isn’t going through to the front of the work). Pull through 3-5 stitches at a time until you get all the way around, then make a little knot and loop through it for extra security. Pull through a few more stitches, then snip off the tail.
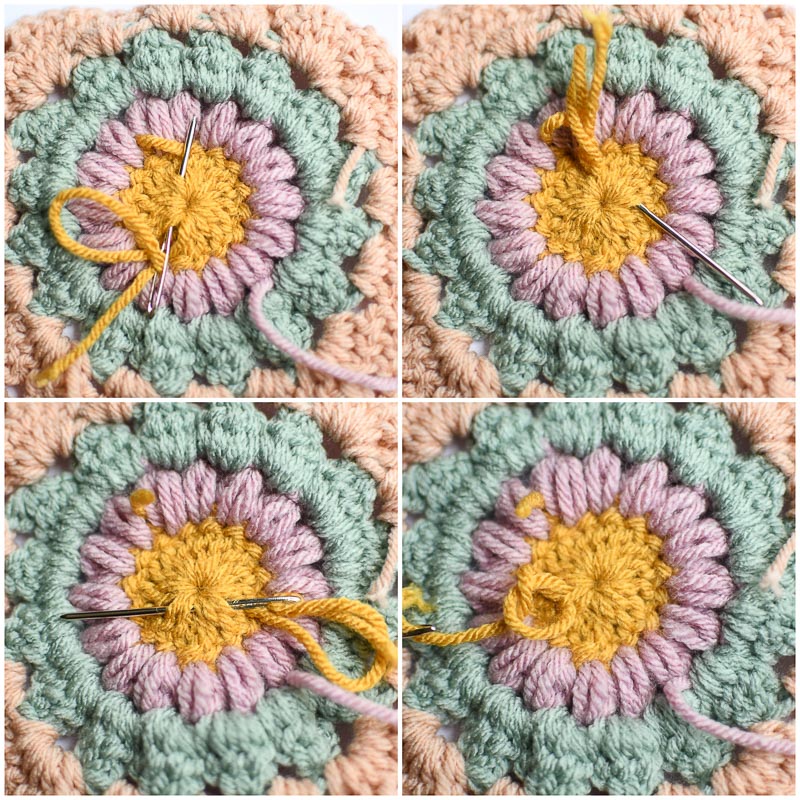
Snip off the remaining tails from all the rounds and the back of your work should now look like this.
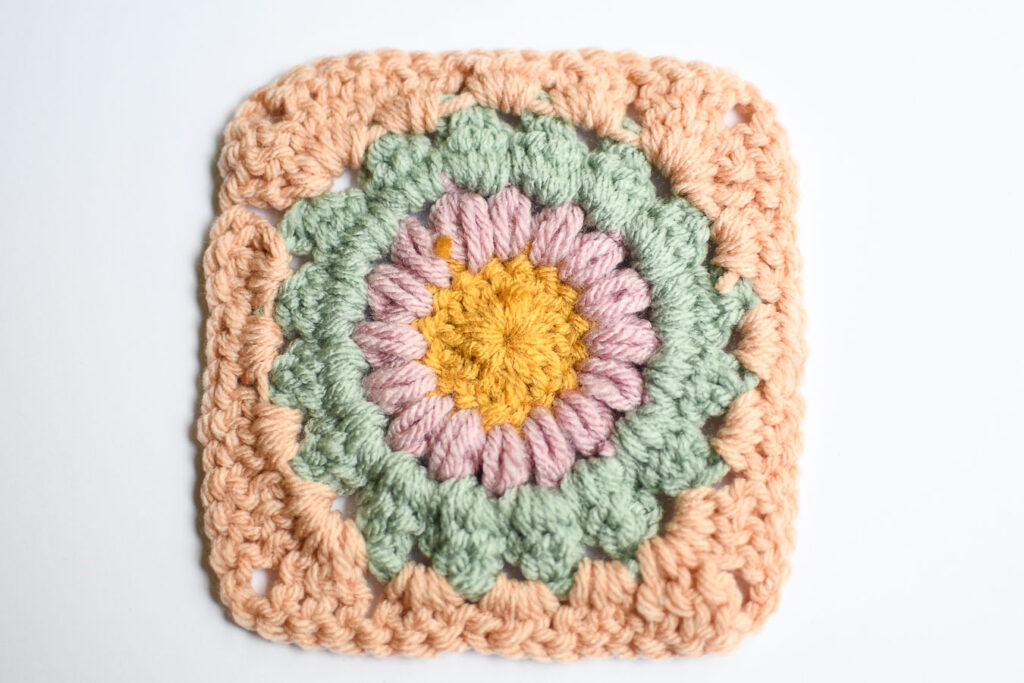
That’s it! Now you’ve created a lovely sunburst granny square that you can use for lots of different projects. Happy crocheting!
If you’re ready to make a blanket, check out my Spring Sunburst Blanket! If you have any questions, feel free to leave a comment and I’d love to help you.
I liked it very much.
Thank you!
What do you mean by darning needle? I am a beginner so I don’t know if this is a typo or not. K thanks love you bye
By the way that is a beautiful pattern ❤️
Hi Livi, if you look at the last collage of photos, you’ll see a large blunt tipped needle that I’m using to weave in the ends. That is a darning or tapestry needle. They can be straight or come with a curved edge for easier weaving. They come in plastic and metal as well. Just look around at just about any craft store and you’ll find them. Happy Crocheting!
Hi Katie, this is quite simply the best crochet tutorial I’ve ever read. I’m a visual learner and usually need to follow a video when using unfamiliar stitches but I understood your instructions perfectly. Your photos are so clear and helpful, and I appreciate the showing of how to weave in the ends! Most patterns simply say “weave in the ends”, so I love that you took the time to show us. Just wanted to give you major kudos for how awesome this is! I’ve been crocheting for 10 years on and off and I’ve quite literally never read a pattern more clearly written, more detailed, or more clearly visually conveyed than yours. Bravo.
Hi Soph, thank you so much for taking the time to comment! This is the most thoughtful and kind response I’ve ever received! I wrote this tutorial with my daughter (who is a newbie crocheter) in mind so that it would work for a complete beginner. I appreciate your feedback and so happy to hear that it worked well for you!
Hello, I would like to make the square bigger by adding an extra row. How would I do that? Could I just do a double crochet in each stitch all the way around or would I need to treat the corners differently? Thanks!
Hi Heather, there are a couple of ways you can do it. If you know how to make a plain granny square, you can do add a row of granny stitches (3 DC in each space between the clusters from the previous row, 3 DC, Ch 2, 3 DC in the corners), or you if you want a solid looking row, you can double crochet in every stitch, then add 2 DC, Ch 2, 2 DC in the corner stitches. I’ll try and crochet a few soon and add them to the post for reference!
Hello, I’m looking forward to make a blanket for my niece. In Round 3, is it one partial cluster stitch then the rest full clusters, or alternating partial cluster – cluster – partial cluster – cluster, etc. it says “Continue around,” but I wanted to make sure. Thank you.
Hi Amy, the first one is the partial cluster and the rest are full cluster stitches. I’ll edit the post to make that a little more clear. Good luck your blanket and happy crocheting!